
Assembling a stationary bike might seem intimidating at first. But with the right tools and clear instructions, you can do it yourself. This guide will walk you through how to assemble your stationary bike in 5 easy steps and help get your bike ready for your first workout.
Fixtman helps thousands of people set up their home gym equipment every year. We know what works and what doesn’t. We’ve created this guide to make your assembly experience smooth and straightforward.
Why Proper Stationary Bike Assembly Matters
A properly assembled stationary bike gives you a safe and effective workout. When your bike is correctly put together, you won’t experience wobbling or mechanical issues. This means you can focus on your fitness goals instead of worrying about equipment problems.
Taking time to assemble your bike correctly also extends its lifespan. Each component has a specific purpose and must be installed properly. Rushing through assembly can lead to damage that costs money to repair later.
Tools Required for Stationary Bike Assembly
You won’t need many tools to assemble your stationary bike. Most bikes come with an Allen wrench set in the box. You might also need a Phillips head screwdriver and an adjustable wrench.
Here’s what you should have ready before starting:
| Tool | Purpose | Necessity |
| Allen Wrench Set | Bolts and hex screws | Essential |
| Phillips Screwdriver | Machine screws | Essential |
| Adjustable Wrench | Pedal and crank assembly | Highly Recommended |
| Rubber Mallet | Gentle tapping if needed | Optional |
| Work Gloves | Hand protection | Optional |
Check your instruction manual to confirm the exact tools you need. Different bike models sometimes require different tools. Having everything ready before you start saves time and frustration.
Step-by-Step Stationary Bike Assembly Instructions
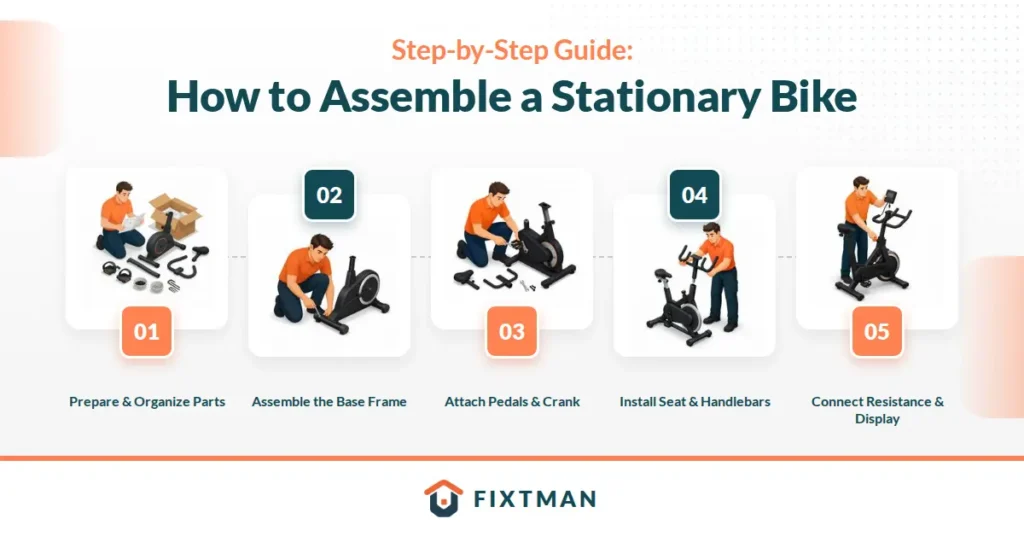
Step 1: Prepare Your Space and Organize Parts
Before you begin assembly, clear a large space where you can work. Lay out all parts and hardware on a clean surface for example bolts, screws and nuts, washers, rovets etc. This helps you see what you have and prevents losing small pieces.
Check the parts list in your manual and confirm everything arrived. If any components are missing or damaged, contact the manufacturer immediately. Organize all bolts, screws, and fasteners by size using small containers or bags to keep them separate. This simple step saves time when you need specific hardware during assembly.
Step 2: Assemble the Base Frame
- Start by connecting the main frame pieces together. Most stationary bikes have a base frame made of 2 to 4 sections. These sections bolt together to create the foundation of your bike.
- Insert all bolts loosely at first. Don’t tighten them completely yet. You want the frame to have some movement so you can align everything properly.
- Once all bolts are in place, tighten them in a circular pattern. Start with one bolt and move across to the opposite side. This method ensures even pressure and proper alignment of the frame.
Step 3: Attach the Pedals and Crank Assembly
- The pedal assembly is one of the most important parts of your bike. The crank connects to the pedals and creates the cycling motion. This component must be perfectly aligned for safe operation.
- Install the crank arms onto the main shaft first. These typically bolt on with large bolts. Use your wrench to tighten these bolts securely, but don’t over-tighten as this can damage the threads.
- Next, attach the pedals to the crank arms. Pedals screw into the crank arms, but the left pedal has reverse threading. This means you turn it counterclockwise to tighten it. Check your manual to confirm the threading direction before installation.
Step 4: Install the Seat and Handlebars
- The seat post slides into the frame and adjusts for height. Insert it fully into the designated slot on the frame. The seat should move smoothly up and down without wobbling.
- Attach your seat to the seat post using the bolts provided. Make sure the seat is level and facing forward. An uneven seat can cause discomfort and poor posture during workouts.
- The handlebar assembly typically attaches to the front of the frame. Align the handlebars so they face forward and are level. Tighten all bolts securely but don’t over tighten them as this can crack plastic components.
Step 5: Connect Resistance and Display Components
- Your stationary bike likely has either magnetic or friction resistance. The resistance mechanism connects to the flywheel at the front. Follow your manual carefully for this step as it’s model-specific.
- Attach the digital display screen to the frame where indicated. Run any cables through the designated pathways. Cable management looks neat and prevents cables from catching during use.
- Double-check all electrical connections before plugging in your bike. Make sure nothing is loose or disconnected improperly. A secure connection ensures your display and resistance system work correctly.
READ ALSO: Best Practices for Installing Home Cardio Equipment
Testing and Calibrating Your Bike After Assembly
Never use your bike until you’ve completed a full inspection. Sit on the seat to check seat stability, Spin the pedals by hand to ensure smooth, quiet operation. Test your resistance system at different levels. Adjust your seat height so your legs have a slight bend at the bottom of each pedal stroke. Your handlebars should be at or slightly below seat level. These adjustments help you maintain proper form and prevent injury.
| Adjustment | Proper Position | Why It Matters |
| Seat Height | Slight knee bend at bottom | Prevents knee strain and injury |
| Seat Forward/Back | Knee over pedal at 3 o’clock | Improves power and comfort |
| Handlebar Height | Level with or below seat | Protects lower back and shoulders |
| Handlebar Distance | Comfortable arm position | Reduces wrist and shoulder pain |
When to Call a Professional Assembly Service
Some people prefer professional assembly over DIY. Fixtman offers expert assembly services in your area. Our technicians have assembled thousands of stationary bikes.Professional assembly takes about 1 to 2 hours depending on your bike model.
You’ll receive a fully tested and calibrated bike ready to use. Our technicians can also answer questions about your specific bike. If your bike has electronics or advanced resistance systems, professional assembly might be worth the cost. These complex components require technical knowledge to install correctly. A mistake here could affect your bike’s warranty coverage.
DIY vs. Professional Assembly
| Factor | DIY Assembly | Professional Assembly |
| Cost | Free (no labor fees) | $75 to $200 depending on model |
| Time Required | 2 to 4 hours | 1 to 2 hours by professional |
| Tools Needed | Basic tools required | Technician brings all tools |
| Warranty Impact | Maintained if done correctly | Fully protected and guaranteed |
| Experience Level | Best for mechanically inclined people | Best for those unfamiliar with assembly |
| Testing | You must verify everything works | Professional tests all components |
DIY assembly works great if you’re comfortable with basic mechanical tasks. You save money and learn how your bike works. This knowledge helps with maintenance and adjustments later.
Professional assembly from Fixtman takes stress out of the equation. You don’t need tools or mechanical knowledge. Your bike arrives fully assembled and tested by an expert. You can start working out immediately without worry.
Many people choose professional assembly for complex bikes. High-end stationary bikes have more components and electronics. These bikes can be tricky to assemble correctly the first time.
Conclusion
Assembling your stationary bike is an achievable task for most people. Follow the steps in this guide carefully and take your time. A properly assembled bike provides years of reliable workouts.
If you’re unsure about any step, Fixtman is here to help. Our professional assembly service removes all the guesswork. We guarantee your bike will be assembled correctly and ready to use. Contact us today to book your assembly appointment and start your fitness journey with complete confidence. Let us handle the setup so you can focus on achieving your health goals.
Frequently Asked Questions
How long does it take to assemble a stationary bike?
Most stationary bikes take 2 to 4 hours for DIY assembly, while professional assembly by Fixtman takes 1 to 2 hours.
Does assembling it myself void the warranty?
No, assembling your bike yourself doesn’t void the warranty as long as you follow the manufacturer’s instructions carefully.
How much does professional bike assembly cost?
Professional assembly typically costs between $75 and $200, depending on your bike model and local service rates.
What tools do I actually need for assembly?
You primarily need an Allen wrench set, Phillips screwdriver, and adjustable wrench, which usually come with your bike.
Can I assemble my bike without the instruction manual?
We strongly recommend using the instruction manual since each bike model has different assembly requirements and specifications.
Why is my bike wobbling after assembly?
Wobbling usually means bolts aren’t tight enough or the base frame isn’t properly aligned, so check all connections carefully.
Should I tighten all bolts as much as possible?
No, over-tightening bolts can strip threads and crack components, so tighten firmly until you feel resistance then stop.
How do I know if my seat is at the right height?
Your seat is at the correct height when you have a slight bend in your knee at the bottom of each pedal stroke.
What’s the most common assembly mistake people make?
The most common mistake is rushing through assembly without carefully reading the instruction manual for your specific bike model.
Is professional assembly worth the cost?
Professional assembly is worth it if you lack mechanical skills, have a complex bike model, or want the guarantee of expert installation.